Tuesday, June 23, 2009

DAY 17

Today, Pat Callahan went over design options and third party software.

  Design Options

Design Options help to Schedule, Quantify and Visualize different designs within a building

Schedule – In order to provide a comparison of two design options, you can schedule both options and have a comparison of costs, materials, and labor in order to give the client a better idea of what goes on in the design

Quantify – Like scheduling, you can account for exactly what you need and how much you need of it in order to implement the different designs

Visualize – Main element that the client will be interested in, in seeing the different designs and being able to compare them

Third Party Software

Third party software are the analysis tools which takes databases produced in Revit and analyzes that information.  Especs is the software which takes information from Revit to compile the Specs of the project. Innovaya is the cost estimating software which utilizes types and amounts of materials in order to produce a cost estimate. There are also programs which compute energy analysis, structural analysis, and mep analysis. 


Monday, June 22, 2009

Day 16

Today in class, Shane Gray and Elizabeth Veatch talked about linking files into a Revit project.  We also got a chance to learn about massing from Craig. 

Linking Files

-linking is the process of importing a revit project into another called the host file

-control visibility through a host’s visibility graphics – the Revit Links button on the top of the page allows you to control the visibility graphics for each individual link – click on By Host View of the Linked document to change how it is seen

-in order to change anything in the linked files, you must close the host view, make the change in the original document and reload the link into the host project – this can be done by going into file, manage links and clicking the reload button

-when making schedules ensure the option “include elements in linked files” is checked

Massing

image-two different ways to make masses

creating a mass – created using the solid and void forms in order to create custom 3d objects

placing a mass – utilizes pre-defined shapes in order to create massing forms, good for use in conceptual work

-the wall by face, floor by face, curtain system by face, and roof by space allow you to select a massing and associate it with building properties…for example making a mass become a wall, you would click on the wall by face and then select the type of wall you want the mass to be and define it-helpful tool when transforming conceptual into a defined form

-creating a mass-utilizes different sorts of tools in order to manipulate 3d geometry

solid extrusion-takes a face and extrudeimages it

solid blend-draw the top and bottom, or side to side profiles and it creates a custom form between the two profiles-used for geometric forms

solid revolve-creates a mass by taking a profile and rotating it to define its path

solid sweep-like the solid blend, used for organic forms, where a profile is connected through a defined path

solid swept blend-like the solid sweep, except there are two profiles in which need to be defined as well as their extrusion path


Thursday, June 18, 2009

Day 14

Today, Adam Wallen taught us the fundamentals behind Families, in particular in door families.

Fundamentals of parametric families

Create reference planes to constrain family elements

For door and window families, make sure the opening cut is large enough to encase your family (to get to opening cut go to the edge of the family and press tab until you get it)

Add parameters to dimensions to make family types

When family utilizes parameters effectively, the family can be scheduled

WORD OF WISDOM FROM PAT CALLAHAN

Before beginning a family think about what you want to accomplish when building the family.  This may require you to constrain proportions of different elements in the family or create parameters for those elements.  Think about how one element needs to move with its hosting element and how you can accomplish that.

Wednesday, June 17, 2009

Day 12

Boot Campers

revit bootcampers - we are really really good looking

Today in class, Mike Padavic and Michael Herdegen taught the bootcampers about sloped roofing, flooring, and slabs and furthered our knowledge about how to create curtain walls in Revit.

Sloped Roofs, Floors, and Slabs

WHY? To follow site work, control drainage

HOW? Slope structure or taper insulation

The method to sloping floors, roofs, and slabs is the same, so you can apply the steps below to any of these. 

  1. Create the element as you normally would
  2. In a floorplan view, look to the options bar to find this toolbar. This allows you to split the surface you have created and add reference points in order to create the differences in elevationsimage  
  3. In order to get your desired effect, you will have to play with some of the options above, but in order to give an example, we will create a roof which is sloped 
  4. The roof is already made, so the next step is to add valleys in order the split the surface up.  This can be done by selecting the image button.  Draw a line in the areas you want to add valleys or ridgesimage
  5. 5. Once this is done, you can change the elevations of the ridges/valleys by using the image
  6. button and changing the elevation (option give to you on the design options toolbar)

6.  You can also have the slope come to one point by using the imagebutton. This will allow you to define the elevation of one point on the roof and have the rest of the enclosed portion follow

image

image


effect of defining ridge              effect of defining point elevation                                 elevation

This process is the same for floors, slabs and roofs, so play around with the options to get the desired effect.  If you need a path to follow contour marks, however, you may also define that path’s slope in the site menu.

Curtain Walls

guidelines for creating curtain walls

  • to create custom profiles for mullions, create a new family of mullion and load into the project (you can also insert details components into the projects this way)
  • to put in a curtain wall door, select the panel in which you want to place the door, and select the door out of the wall menu (door not found in doors tab, but found where the curtain wall and curtain panels are)
  • to create a curved curtain wall, draw the curtain wall with the curve tool and place mullions (if you do not place mullions, the curtain wall will appear straight…mullions give the curtain wall its curved shape)
  • you can select different pains of glass and turn them into walls or panels in order to vary the curtain wall’s appearance
  • in order to create a curved curtain panel, create a new panel family and draw out the curve with the solid extrusion tool then load the new panel into the project…select the panels which you want to be curved and change their properties from the curtain panel to the curved panel in the type menu

Day 13

Today, Pat Callahan taught us how to work incorporate topography into a site and about how important collaboration between consultants and architects is and how Revit can assist in the flow of information. 

Site Topography

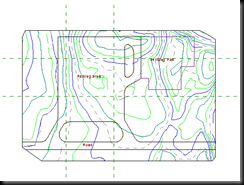
Background: The relationship between a building and the ground line is extremely important, as it establishes how a building sits in an environment, how the foundation is seen, how a “balanced site” is achieved, and how building is successfully incorporated into an environment.  The technology we have today to map contours allows the architects to get a 3d image of the site, through a GPS system which plots points throughout the site translated into an ASI file.  An ASI file can be brought into Revit, and because the plotted points have an x, y, and z coordinates, we are able to view a 3D model to which we can better incorporate a building into.  This new technology adds a better understanding of the site in much less time than in previous years. 

How to use an ASI file to create site topography:

image

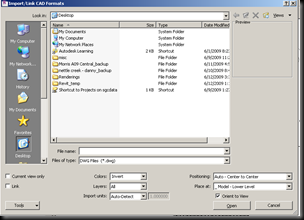
  • To import an ASI file, go to import, CAD formats, and choose your file.
  • To create a toposurface from scratch, go to the design bar, click toposurface and then click point. Set different elevation points according to the site surface, and click finish when you are done.
  • In order to edit the topography, you have a number of tools at your hands in order to get the look you want to achieve.
    • Visibility graphics: in the visibility graphics dialogue, you can edit boundary points, interior points, primary and secondary contours, and triangulation edges in order to change the way you view element of the topography.
    • Site Settings Box (under settings menu): you can edit property data, with different property lines, angular values, or bearing values. Also able to edit section graphics of the site.

image

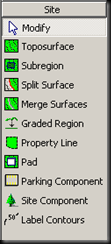
    • Splitting Toposurfaces: in the design toolbar, you are able to edit different surfaces within a toposurface. In the site shown above, you would split the site boundaries from the parking lot boundaries, island properties, and building pad.  This allows you to dissociate the areas from the original toposurface and edit them individually.
    • Merging Toposurfaces: in the design toolbar, you are also able to merge regions if they have common edges or overlap in any way.

image

Site Tools

Subregion: subregions are isolated regions sketched on a toposurface which can be associated with different materials  and elevations.  This can be put in by sketching it on the toposurface.

Graded Regions: method to create elements like parking lots, where you extract an area from the toposurface and change its elevations and properties.  When you create a region, the cut region is shown is translucent graphics, and you will be able to view the cut and fill volumes in order to modify the surrounding landscape.

Property Lines: the legal boundary lines of a property which are created with fixed distances, angles, and directions in the site settings box.

Pad: vertical cuts in a toposurface that represent excavations and slabs.

Site Components: In order to complete the site you are able to insert site components like trees, shrubs, parking spaces, parking islands, utility poles, vehicles, etc.


Importance of Collaboration

Revit is the new technology creating a way for different professions to have an entirely new way of communicating with each other: in 3 dimensions.  There are three Revit programs: Revit Architecture, Revit Structures (which is also built into Revit Architecture), and Revit MEP (which is a separate program used for mechanical, electrical, and plumbing).  The collaboration of these three programs along with outside analysis programs like Innovaya, IES, Navis Works, Green Building Studio, etc..  Elements in Revit like family components, schedules, details, and area plans enable architects to communicate better with consultants and clients, which inevitably will result in more efficient buildings.

Monday, June 15, 2009

Day 11

Today in class, Angie taught us bootcampers about Exporting Files and Energy Analysis Modeling. 

Importing/Exporting Files

In the file menu, under export, there are a number of options in which you can export a Revit model into a format to which a third party can work with. 

image

CAD Formats – exporting into a format that AutoCAD products can read

Walkthrough – this menu gives you the ability to export a walkthrough into a video format

Animated Solar Study – this is just like a walkthrough with emphasis on path of light

Image – exports view into an image format

gbXML – exports the file into a format that an energy analysis program can read

Room/Area Report – provides a report of the area and volume of rooms – helpful for energy analysis models

3ds Max (FBX) – this setting exports the BIM model in 3d form to a format 3d studio max can read.  It imports materials and components, but you need to place your own lights


The gbXML format is used for energy analysis programs like Autodesk’s Green Building Studio and IES.  This is much like rendering, in that you want to limit what you are rendering to make the process as uncomplicated as possible. For this format, you may only need to export walls, windows/doors, flooring, roof, and room tags.  For this to work, you need to go to make sure area/volume computations is checked under the settings area/volume box.  You also need to extend the room boundary up to the roof as shown below.  Under project information in the setting tab, you need to go into Energy data and input the building type and postal code so that the energy program can process the building.  

image

image image

Once in the energy analysis programs, you need to input some of the need data, like construction method, type of curtain walls, etc. in order to obtain the correct information about the building.

Friday, June 12, 2009

Day 10

Today in class, Adam Wallen taught the bootcampers about working with groups and linking models. 

Groups

To group components together, highlight the ones you wish to group and press group on the edit bar.   image

That will bring you to a model group bar in which you can edit the groups any way you would like. image

For Material Take-off schedules, go to view--->new--->material takeoff and that will enable you to choose the type of material schedule you would like to create.  From there use the fields in order to break down which categories you would like to include in the schedule.  Once you create the schedule, you will need to populate it with the needed information in order to finish it.  If you go to element properties, it will give you the option to get to the window below in order to edit the schedule.  Besides adding fields, you can also add parameters about any components of the list as well as create a series of filters and formats in order to help organize the schedule better. 

image

Importing/Exporting CAD formats

In order to import a CAD file, go to file--->import--->CAD formats.  Here you will be able to decide how you would like to view the imported CAD file.

To Export into Cad go to file --->export--->cad formats.

imageManipulating CAD Images

In order to manipulate the cad file, go to the options bar at the top and you will be able to adjust whatever you would like. DO NOT EXPLODE A CAD FILE. The query command allows you to edit the image as you need to by allowing you to delete or hide some elements.

image

Linking Files

In order to Link files to one another, as in the case of linking structural or electrical files to the BIM model, go to file ---> import/link Revit.

Managing Views

In order to manage your views of linked files, go to visibility graphics and go to the Revit links.  Here you will be able to view and update Revit Links that you have in your file. 

Thursday, June 11, 2009

Day 9

In today’s lesson, we learned about the visibility graphics in Revit from the head honcho of Revit, Craig Meadows.  We also got a chance to work with legends and schedules.  There are a number of ways in which you can control the view settings in Revit: through the view toolbar on the bottom of the page, through view properties, or through visibility graphics.

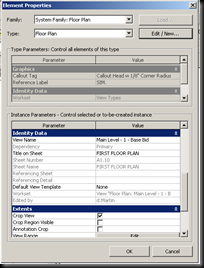
imageThis toolbar on the bottom off the page contains a lot of the same things that view properties does in a convenient toolbar.  It contains the scale, level of detail button (course, medium, or fine), display graphics (wireframe, hidden line, shading, or shading with edges), shadows button (which can slow your computer down if turned on all the time-use on a need basis), crop regions, temporary Hide, and a reveal hidden objects bar.  Before getting into a project, a good method is to get used to these settings and decide personal preferences regarding viewing your project.

image

image


image

The view properties toolbar allows you to change some of the same types of things but also offers you options on how to use an underlay, extents, phasing, and much more. To get to this menu either right click on the view or type vp.  An underlay is an option you can choose if you wish to see a floor plan on another one, like if you are on the bottom floor and want to see a grayed out version of the top. In extents, you can manage the view range, or the ability to change the extents of a certain view.  The scope box is a way to take a 3D view and make only show portions of the drawing.  You do this by positioning the box so that the element you want to see are in the box and the ones you don't want to see are not.  This works great for 3D floor plans or axonometric sections.

The visibility graphics is a way to control what and how you see elements in the view.  The quick way to get to this menu bar is to type vg.  The checkmarks along the left side of names of elements controls whether or not elements are to be shown in the view.  In the model categories bar, you can control how model elements are shown.  In the annotation categories, you control how annotation and dimensions are viewed.  In imported categories tab, you can filter which imported files, like dwgs, are shown.  In filters, you can create filters which manage which types of elements can be shown.  And the worksets bar allows you to turn on and off worksets.

image 

Legends are views which can be put into multiple sheets, unlike other views.  In general they are ways to put notes in a consolidated location.  You create a legend by going into view and create new, legend.  When adding in legend components, they are not really components, but rather pictures of the component info.  Legend tags are created by placing a symbol into the legend.  In order to change the legend in any way, you must go to the family editor.

Area schedules are much like room schedules.  They can be very important in the integration of program requirements, configuration of cost of building based on cost per square inch, or in indication of spacial requirements. 

Material takeoff schedules pulls information from the project about the types of materials being used and is very helpful in computing material costs, quantities, and other helpful information. 

Schedules allow a user to create a database of information drawn from the model in order to input it into third party programs or in order to compute necessary information about the project, which reduces amount of computing time. 

Wednesday, June 10, 2009

Day 8

In today’s lesson, Chris Sharkey and Elizabeth Veatch taught us about worksets and worksharing capabilities.  They also were able to incorporate phasing, design options, and color schemes as part of the lesson. 

Worksharing

Worksharing is the method of setting up a file so that multiple people can work on it at the same time, which can speed up the time it takes to produce a BIM model if executed correctly.  The main file which everyone is to work off of is called a central file, usually found in a network server.  Having a central files enables multiple people to work off of one file while keeping it organized, while also preventing any confusion in transition of work.  Basically, having a central file will keep one person from changing something in the file they are not supposed to, as those changes need to be authorized by the person in charge of the certain workset.

A workset is an organizational model which allows for division of work within a project.  Worksets are organized graphic overrides much like layers in autoCAD which works with the visibility of elements in a given view.  For example, you could put exterior elements and interior elements of different worksets so that one person can work one one and another on the other.  Worksets are the engine that makes worksharing possible.  Under worksets they have indications of who is working on the file and who has permission to do the work. In the options bar, there are owners, who are the people who checked out the workset by changing the no on editable to yes.  There are also borrowers, who can open the workset which is being checked out, but cannot edit it.  This restricts people from changing things around without relaying it to the other people working on the project.

image

steps for working with a central file

  1. Copy the central file onto a location on your computer
  2. A message will pop up acknowledging your presence  in the central file, click ok and then save the file so that you acknowledge you want to work in the file
  3. Right click on any of the design bars at the top of the page and turn on worksets
  4. Click on the button to manage worksets and there you will be able to turn on any of the worksets you need to work with.
  5. Under  the editable tab you want to switch to yes to any files you plan on working with.  Once you do this, you have “checked out” that workset and thus cannot be edited by anyone else.  This provides a safety device to stop other people from changing the same things around.
  6. When you check a workset out, you become an owner and have gained access to the file.  After you are done using the file, you need to go to file and press save to central file to update the file.  You will then be given an option to relinquish your authority over the workset, which now enables it to be edited  by another user.
  7. In order to see any updates to the file, go to file and press reload latest in order to sync back up with the central file. 
  8. If you are not an owner and use the workset you are a using the workset, you are a borrower.  If you make any changes to the file, you have to request to make these changes and have the owner of the workset authorize it.
  9. It is a system of collaboration, so while working in the program, you also need to confer with the other users in order to be successfully integrates into the system.

imageWorkset toolbar

steps for creating a local file from a central file

  1. Copy the central file onto another location on your computer and rename the file
  2. Go to file ---> open and select the file which you have saved onto your computer, and uncheck the detach from central box located at the bottom of the open screen
  3. Save the file onto the specified location on your computer
  4. Save as the file and under options button located on the right side of the save as box, select the make this a central file after save box and change number of backups to 2-6 depending on need (more backups take more space of the hardrive/server)
  5. Once you have done this, you have acknowledged it is its own file and you will be able to work on the file without messing up the central file

Phasing

Phasing is an organizational method which allows you to categorize building elements by which phase of construction the belong to.  Some examples of phases that can categorize these elements are: demolition, new construction, existing conditions, etc.  In CAD, you would have to have all of these of different files and use different layers to communicate the phasing, but in Revit, you are able to utilize phasing in one file, making it much easier to organize and understand.

Under the settings tab, you can define different phases that you want to use.  The phasing filters tab defines what you see in each view.  For example if you choose demo + new, you will see what elements are being demolished and which ones are new.  In the graphic overrides tab you can delineate how the different phases are to be shown, for example, demolished elements are red dotted lines.  In order to select which elements are in which phase, go to the element properties under phasing and choose which one you want.  In order to establish which view is in which phase, right click in the view and go to view properties.  When you pick a phase and a phase filter, you decide what you want to see in that view.  For example if you want to show the demolition phase you would choose the phase that correlates with that and then under filter choose an option with demo in it to see what elements are being demolished.

image

Design Options

Design options allow for you to show a couple different options in your design without having to open a new file.  For example, if you have two designs for an entrance and want to show both to a customer, you create two different design options and let them choose which one works best.  Again right click on the top design bars to activate the design options bars.

image

To create design options, you go to option set and define what design option you are doing.  In this example the design option is the entryway.  Then you define the option to which you can choose.  In this example, the two options are with an atrium and without one.  When in the view, go to the design option bar shown below to select which design option you want to show.  You do this by going into the design options button and selecting the option you want.

image

Tuesday, June 9, 2009

Day 7

In today’s lesson, we learned how to work with and modify families. There are three types of families:

systems families

These families are preloaded into Revit and cannot be created or loaded into Revit.  These include walls, roofs, floors, levels, and dimensions.  You can create different types of these families but the system itself cannot be recreated or changed. 

component families

Component families are template based families loaded into projects which are comprised of different configurations of model components, annotations, symbols, and sizes.  These can be created or loaded into Revit.  There are many standard family templates that can be edited to change components sizes and geometries.  In order to make the component a standard component, you must save it as an external RFA file and save it to your standard template.

Parametric

in-place families

In-Place families are created and modified families which are saved to a project.  These are then used within the project they are created and do not exist beyond it.  If you do not believe that you will need to use the component beyond the project, then in-place components would be the best thing to use.

Creating Component Families

Parametric values define family types.  An instance parameter controls the single account of a family type i.e. one door. When you modify an instance parameter, you change one element.  A type parameter controls all instances of a single family type. When you modify a type parameter, you change the parameter for every instance in the family type.

Component Family--->Type Parameter--->Instance Perimeter

Parameter Characteristics – when you create a parameter, you specify a discipline, type, group, and whether it is a type parameter or an instance parameter.

Family Editor 

imageThe family editor is the tool in which you can create component families. To open the family editor, you must either choose a template in which to work off of or select a family and press edit family on the options bar.

The family types dialogue box found within the family editor helps define a family type by creating geometry of the type, by defining type parameters, and by flexing the family type. To define the type parameters, you can associate dimensions with a certain parameter or you can define parameters based off of formulas in the types dialogue.  In order to correctly use reference planes, you should draw the planes and associate a certain property, like length, width, or depth with them.  You can then constrain or align the element with the reference planes.

Family Types Toolbar

image

Parametric formulas can be created in family types dialogue box and calculate value of a numerical parameter.  The formula is a parameter calculated through the use of other parameters, like Depth = Width/2.  These formulas can utilize addition, subtraction, multiplication, division, and some trigonometric functions.  These formulas are case sensitive, however, so be aware of that.  You can also use conditional formulas which establishes relationships betweens certain conditions like:

if (<condition><result if true>, <result if false>)

Formulas can utilize <,>,=, and and/or/not statements.


Step by Step Guide to Creating Component Families

image

  1. Define the category of the family by selecting a template, which defines the way the family can be used  (ex. select a door template to create a door family)
  2. Create reference planes and add dimensions between.  You can use references planes in order to set height, width, depth, left/right or front/back distances, and sizes of subcomponents. 
  3. Create parameters in order to define values for elements in family, such as widths, lengths, heights, and other parameters.  These are assigned values of elements which are used in order to define the element as well as create new types within the family,
  4. Assign labels to dimensions to associate them with parameters.
  5. Flex the family and add the 2D AND 3D geometry (flexing the family is the method of changing the parameters in order to ensure that element components are defined correctly).
  6. Assign geometry to subcategories, like door hardware on a door, and assign parameters the elements can associate with.  Some parameters can include materials, Yes/No circumstances, and dimensional parameters.  These parameters will link the subcategory to the component family.
  7. Associate symbolic and model lines with a subcategory which can be done using the type selector list or using element properties.
  8. Define types in families, which are based upon size, materials, or subcategories.
  9. Save the family and load it into a project.
  10. Verify the family if working correctly in each of the views.

Creating Nested Families

A nested family is a component family that is loaded into another component family.  The main family is the component family in which hosted the nested elements.  When a nested family is loaded into the main family, its properties like its definitions, materials, hatch patterns, subcategories, and parameters become available in the family. An example of a use of nested families would be if you have a door main family and want to add things like door hardware, trim, etc. to create an entirely new component family. 

In order to link nested families you must add parameters in the main family in the family editor bar.  You can do this by aligning and constraining the nested components to the main family and linking their parameters together.  You can nest different types of families in to the main family in order to create different types of the family. For example, you can add in many different door families into a cabinet family to create different component types.  To control the visibility of the component, you must create a parameter in order to control the visibility of the element.

GUIDELINES TO CREATING NESTED FAMILIES

  • decide the host family into which you are going to load the nested families or create a new family from a template
  • test a nested family in order to make sure it behaves correctly (to do this mess around with the dimensions to see if its linked with the main family)

Monday, June 8, 2009

Revit Rendering

Rendering

the how to guide

Rules of Thumb

  • Limit what you are showing in the rendering window…the more elements turned on the longer the rendering time
  • Make sure materials are applied to all surfaces
  • Use the region option to test materials, lightings, and exposures to reduce rendering time
  • Use draft setting to test renderings to save time
  • Most printers cannot print 600 dpi, so 300 is plenty
  • Close-ups require higher settings
  • Add building components to enhance renderings
  • Turn off lights that you are not using - speeds up rendering time dramatically 

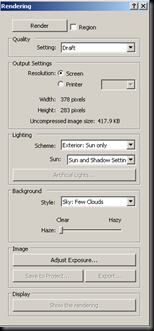
Rendering Dialogue

image

Steps to Rendering

First -  Set up camera views, go to the view toolbar in the design tab and go to camera, place accordingly.

Second – Extend camera extents (red triangle) to the limit of what you want to view in the rendering.

Third – Ensure all building elements have an assigned material.  In order to change material, go into element properties and edit the material used.  There is a large library of materials available in Revit to create a more realistic image.

Fourth – Set up lighting in the project.  In the lighting dialogue, there are a number of options to choose to light your rendering.   Under scheme, you can choose which type of lights you want for exterior and interior renderings, whether it is natural lighting, artificial lighting, or a combination of both.  If you are choosing to use exterior lighting, under the sun option, you can choose the position of the sun.  You can choose one of the presets (summer solstice, winter equinox, sun upper left  upper right etc.), or you can choose a specific latitude and longitude and point of time in the edit/new category to show the suns effect on a specific location at a specific time.  If you want to utilize interior lighting, you must first place lighting components into the building model.  As a method of organization, it is good to group lights according to usage.  To reduce rendering time, only turn on the lights that you intend to use, so it is good to group the lights based off of that principle.  All lighting components can be edited in order to change its properties, like color, ambiance, intensity, etc.  A good method to test out the lighting condition is through the utilization of the draft setting.  Adjusting the exposure of the rendering can also influence the lighting effects upon the building model.   It takes a lot of messing around with the settings in order to perfect this.

Fifth – Once lighting and materiality have been configured, it is time to set up your rendering settings.  Some of the options to play around with are: Quality setting, Resolution, and Background

* the size of the crop box in a rendering effects the time of the rendering.  In most cases, you can lower the size of the box and up the dpi in order to make rendering output faster.  To change this, click on the camera box and under the options bar at top, click on image.  This will open a menu and you can choose to scale down the image box.

  • Quality Setting – this setting depends on the needed quality of the image.  Draft setting is a helpful setting which allows you to see the materiality and lighting of the image without incurring a long draft time.  * Do this before rendering at a higher setting for safety purposes.  In most cases, when doing exterior renderings that are from afar, medium quality is acceptable.  When doing close-ups, a high setting should be used as a greater amount of detail will be shown.  When you need to blow up a rendering dramatically, presentation quality can be used, but is excessive.  * Remember the higher the quality the longer the rendering time.
  • Resolution – this depends on the method of presentation, either screen or printer.  When using printer settings, you can choose the dpi output level (dpi is dots per inch, and determines the amount of detail shown).  Most printers cannot print better than 600 dpi, so unless you are blowing an image up dramatically, 300 or less is fine.  300 is even excessive at times, 150 might be adequate for most renderings.  Again, the higher the dpi the longer the rendering time.
  • Background Image – in general the background image in Revit is bad, if possible Photoshop a background in.  But if not, choose setting under background in which to render a background.  This also ups the rendering time, and it might be quicker to use Photoshop.  

NOW IT’S TIME TO RENDER

Sixth – once you have your rendered image, click the adjust exposure setting in order to tweak the image in order to get your desired image.  Once you exit the rendering dialogue, the image cannot be changed, so make sure you adjust theses settings accordingly.  Once you have the desired image, save the image to project and export it into whatever format you would like.

Congrats…you just learned how to render

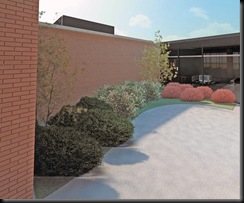
Some Examples of Finished Renderings

Close – Up Exterior Renderings

require a high setting and exterior lighting

 3D View 2

T:\Cook Memorial Library\Projects\08051 - Cook Park Additions and Renovations\E. Contract Documents\E.4 CD\PRESENTATIONS\12.19.

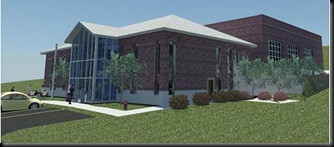
Exterior Renderings with Component Families

require exterior lighting, medium quality setting, and component families
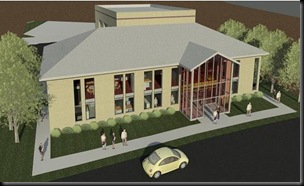
rendering

i_firestation_rendering

Rendering with Section Cut

require manipulation of the section box

1

Exterior Rendering with no Component Families
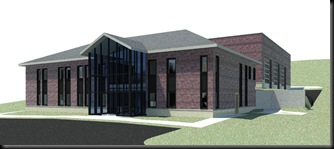
awesometastic rendering

Exterior Rendering with Post Production

(post production blog to follow)awesometastic rendering w photoshop
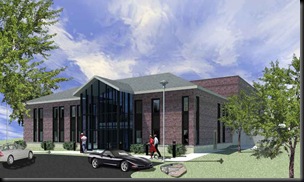
Interior Rendering

requires exterior and interior lighting

Interior Children's 10.28.08 R 

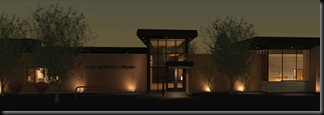
Night Rendering

an exterior rendering with interior lights only shown
Sun_high res copy


Day 6

In today’s class, drill instructor Angie Levinsky taught the bootcampers how to create and modify drawing sheets and title blocks. She also went over how to create renderings and walkthrough, which will be overviewed on the next blog in detail.

The drawing views imageare found in the project browser and control which view you are working with. Drawing sheets are project views which you place different drawing views into, such as floor plans, elevations, sections, 3D views, schedules, and legends.

It is very important to set up a consistent naming convention for drawing sheets as an organizational model, thus the reason for the GCNA standardized template.

In order to manipulate any of the elements once placed into the drawing sheet, right click the drawing view and select activate view. Once activated, you will be able to manipulate any of the elements shown in the view.

The drawings views are numbered in the drawing sheet based upon the order in which they are placed and can be edited under element properties.

Once you have a view selected, you can go into element properties and advanced model graphics in order to set up solar studies to demonstrate the effect of the sun upon a structure at different points in time on a specific location.

Titleblocks are created in drawing sheets and can be edited by clicking the edit family button on the options bar. To edit the project information, go to settings at the top off the page and edit project information. When updating project information, all of the sheets’ project information will change accordingly. The energy analysis tab in this box is information for transferring the building model into energy analysis programs like IES and Green Buildings Studio in order to analyze the energy consumption of a building.

Thursday, June 4, 2009

Day 4

In today’s instruction, Staff Sergeant Craig Meadows taught the bootcampers about working with schedules.  We went over how to create and format component, key, and room schedules, and how the correct manipulation of these elements helps in the transition to other forms of analytical programs, like E-Specs or Innovaya.

A schedule is a formatted view of a building model based on specified needs which you provide.  It resembles an excel file and is a way to format details and specifications. 

A component schedule, much like that of windows and doors, lists each component as well as additional needed information (like cost, area, hardware etc.) that is relevant to the element. 

A key schedule is a way to transfer a set of perimeters into a schedule in order to display additional needed information. 

A room schedule is an information about a defined space like a room’s area, volume, etc.

Shared Perimeters are put into families that go into schedules.

Project Perimeters are not specified in the project, but not automatically put into schedules.

Steps in creating a schedule are as follows:

Go into the view toolbar at the top of the page and select new and schedule/quantities.  In the New Schedule toolbox, you can choose which type of schedule you want to create, or you can choose a multi-categorical schedule.

image


Once you are in this menu, you can choose which fields you want to include as well as options to format and group the schedule.


image


In order to add a Key schedule, you click add perimeter on the toolbox above and you will get a box similar to the one on the right.


image


You then are able to choose what kind of Key Schedule you want to create and format it as needed.


image

You will then, based on your schedule format, have a schedule similar to this.

Formatting a room schedule is very similar to this option, but also requires you to go to the Room and Area tab in the design toolbar and place room tags in order to define the room specified in the schedule. 

In order to create a color fill schedule, which helps differentiate spaces in a given floor plan/section, you go to the settings tab at the top of the screen and go to color fill scheme.  If on the top bar, you differential that you want to create a schedule based off of names of rooms and have already set up your room schedule, you will be able to create a color scheme. 

 image image